Creating an Email Template
Create a template when an event should send mail — for example Package Purchased.
The modal title is Create Template. The subtitle is: Compose the email and use {{variables}} that get filled in automatically when the email is sent.
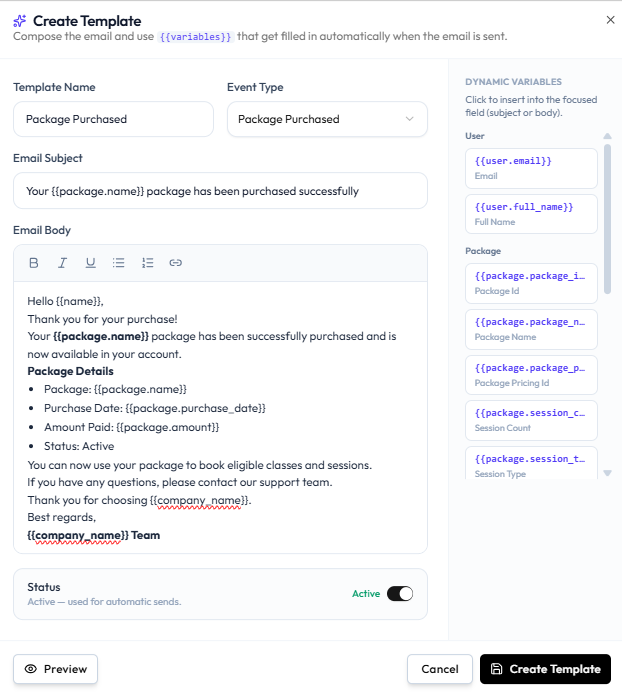
One Event Type per template
Each template has one Event Type. The list already has one template for Package Purchased, one for Wallet Top-up Success, and one for Booking Created.
Whether Fitnez Studio blocks a second template for the same event is not shown. If you need new wording, edit the existing template for that event.
Workflow — Create a Booking Confirmation Email
Email Templates → + Create Template → Event Type Booking Created → Subject → Body → Placeholders → Preview → Create Template
The same steps work for any event, such as Package Purchased.
Step 1 — Open Email Templates
Studio → Notification → Email Notification, then + Create Template.
Step 2 — Name the template
Template Name — for example Package Purchased.
Step 3 — Select Event Type
Choose the trigger, such as Package Purchased. See Which Events Can Trigger an Email.
Step 4 — Write Email Subject and Email Body
The body editor supports Bold, Italic, Underline, bulleted list, numbered list, and hyperlink.
Insert tokens from DYNAMIC VARIABLES. See Using Placeholders and Writing the Subject & Body.
Step 5 — Set Status
The toggle Active has the caption: Active — used for automatic sends.
Turn it off if you are not ready to send.
Step 6 — Preview and save
Click Preview, then Create Template. Cancel or X closes without saving.