Add a Client
Add a member when someone new should appear in the member database — for example a person who has just joined.
This is not the same as adding a team member. A member trains at the studio. A team member is staff.
Before You Start
- Know the person’s name, gender, and email.
- Have a password ready if you are creating the account now.
- Open People → Clients, not People → Members.
Steps
Step 1 — Open Clients
In the left-hand menu, open People → Clients.
Step 2 — Click Add client
On the Clients page, click + Add client.
The window title is Create New Client. New clients start as Active. The helper text is: Fill in the details below to add a new client.
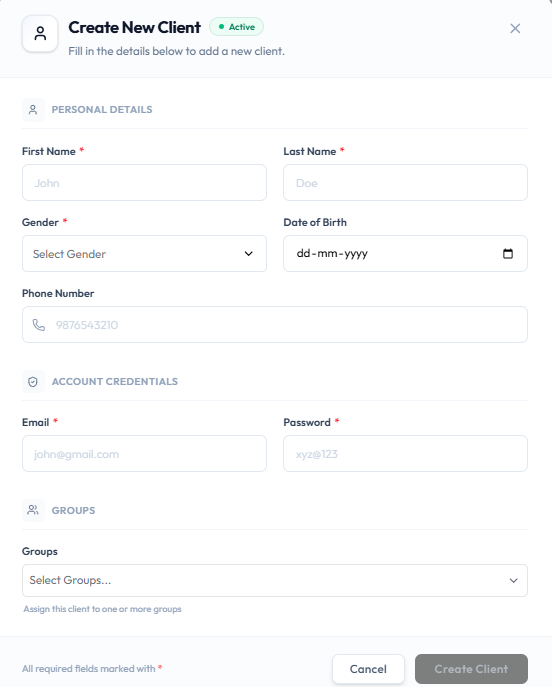
Step 3 — Enter personal details
Under PERSONAL DETAILS, complete:
| Field | Required |
|---|---|
| First Name | Yes |
| Last Name | Yes |
| Gender | Yes |
| Date of Birth | No |
| Phone Number | No |
Required fields are marked with *.
Step 4 — Enter account credentials
Under ACCOUNT CREDENTIALS, complete:
| Field | Required |
|---|---|
| Yes | |
| Password | Yes |
Step 5 — Assign groups (optional)
Under GROUPS, open Select Groups… if the person should belong to a group.
The helper text is: Assign this client to one or more groups. A client can belong to more than one group. See Manage Group Members.
Step 6 — Create the client
The note at the bottom is: All required fields marked with *.
- Create Client saves the record.
- Cancel or the X closes the window without adding the client.
After Saving
The new client appears on People → Clients with status Active. You can find them with search and open Client Detail from the row menu.
Important Notes
- Add members on Clients. Add staff on Members.
- Groups are optional at create time. You can assign them later.