Creating a Standard Event
Create a Normal Event when you need a scheduled member activity — for example a Saturday workshop — without challenge targets.
The form label is Normal Event. The description is: A standard scheduled event. On the Events list that type shows as Standard.
Example
Summer Fitness Workshop at FITNEZ STUDIO in Dublin: a Saturday mobility and recovery session for members. Set it up the same way as HIIT Blast in the screenshot — name, description, dates, JOIN NOW, and a banner.
Before You Start
- Confirm you are in the correct location.
- Know the name, date range, and (if you use it) a banner image.
Workflow — Create a Standard Event
Events → Create Event → Add details → Add image → Continue → Review → Save
Step 1 — Open Events
Open Studio → Manage Events → Event.
Step 2 — Click Create Event
Click + Create Event. The page title is Create Event. The description is: Set up a new event to organize special gym activities.
The stepper shows Basics, then Review.
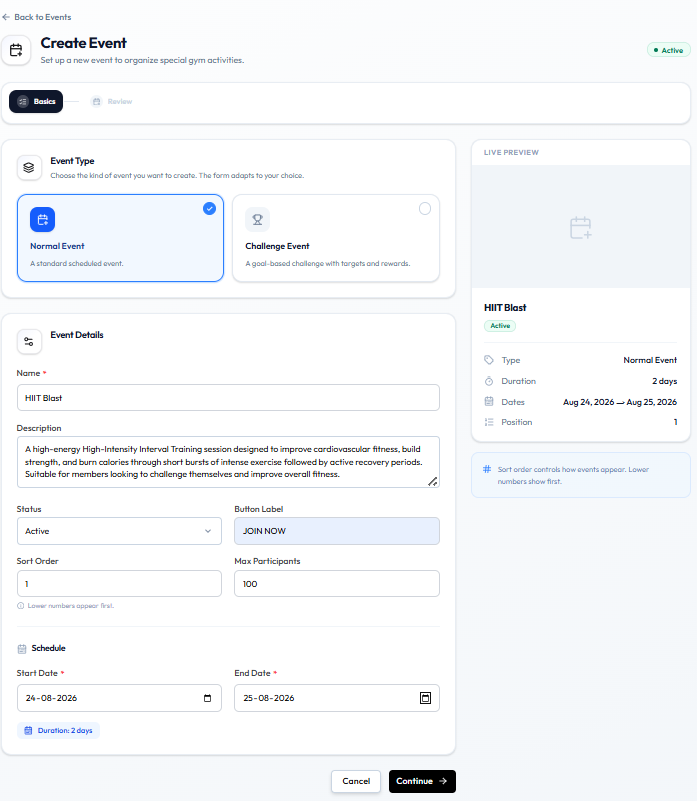
Step 3 — Choose Normal Event
Under Event Type, select Normal Event. Leave Challenge Event unselected unless you are building a challenge.
Step 4 — Enter Event Details
| Field | What it is |
|---|---|
| Name | The title, such as HIIT Blast |
| Description | What the event is about |
| Status | A dropdown: Draft, Active, Inactive, or Completed. See Event Statuses |
| Button Label | Call-to-action text, such as JOIN NOW |
| Sort Order | A number. Help text: Lower numbers appear first. |
| Max Participants | A number, such as 100 |
There is no location field on this form. The studio in the header (for example Dublin) is the site you are working in.
There is no start time or end time on this form — only dates.
Step 5 — Set the schedule
| Field | What it is |
|---|---|
| Start Date | Required. For example 24-08-2026 |
| End Date | For example 25-08-2026 |
A duration badge appears under the dates, such as Duration: 2 days.
Step 6 — Check Live Preview
LIVE PREVIEW on the right shows the name, status, Type (Normal Event), duration, dates, and Position (sort order).
The preview callout is: Sort order controls how events appear. Lower numbers show first.
On create, the image area can still be a placeholder. Add artwork on Edit Event if the banner is not on this step yet.
Step 7 — Continue and save
Click Continue to Review, or Cancel to leave without saving.
On Review you check Name, Event Type, Status, Dates, Duration, Sort Order, and Max Participants. Saving on create is not shown in the current screenshots. On edit, the button is Update Event. See Editing an Event.
Keep the Event in Draft
Set Status to Draft while you finish the name, dates, and banner. Switch to Active when members should see the event.
See Event Statuses for Inactive and Completed.
After Saving
The event appears on the Events list with Standard, schedule dates, participants, order, and status.